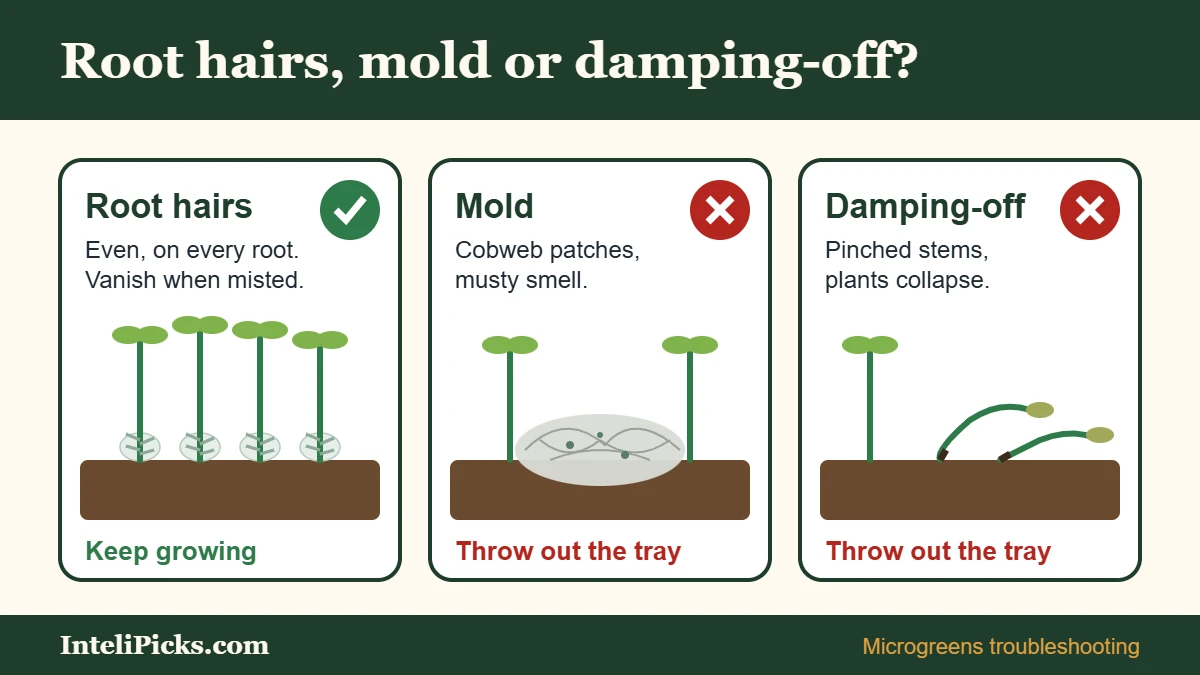
You lift the cover on day three and the tray is fuzzy. Is it mold, or is it supposed to look like that? Most of the time it is fine. Sometimes it isn’t, and then the right answer is the trash can, not a pair of scissors.
This guide is the troubleshooting page for our beginner’s guide to growing microgreens and herbs indoors in winter. It covers how to tell root hairs from mold, what damping-off looks like, the other common tray problems and their fixes, and how to clean up so the next tray starts clean.
Short answer
White fuzz that grows evenly on the roots of every seedling and seems to vanish when you mist it is root hairs. That’s normal. Cobwebby growth that sits on seed husks or bare mix, spreads in patches, holds water droplets and smells musty is mold. Seedlings that collapse in spreading patches with pinched, water-soaked stems have damping-off. For mold or damping-off, don’t cut around it: throw out the whole tray, then wash the tray and soak it in a 1-to-9 bleach solution for 30 minutes. Prevent the next one with less water, bottom watering, less crowded seeding and a small fan.
Safety first. Don’t try to rescue a moldy tray for eating by spraying it, rinsing it or cutting the clean-looking part. The growing mix can carry germs you can’t see, and mold or rot is a sign conditions in that tray were wrong. When in doubt, throw it out. If you cook for young children, older adults, pregnant women or anyone with a weakened immune system, be extra strict, and see the seed and sprout warnings in our main microgreens guide.
Root hairs, mold or damping-off? Check these four things
Root hairs show up most often right after the blackout days, on fast crops like radish, broccoli, cabbage and cress. They are the tiny side roots a seedling sends out looking for water, and they’re a sign of healthy growth. Mold and damping-off are different. Check where the fuzz is, what it looks like, what happens when you mist it, and how it smells.
| Root hairs (keep growing) | Surface mold (throw out) | Damping-off (throw out) | |
|---|---|---|---|
| Where | Only on the roots, evenly on every seedling | On seed husks, dead seeds and bare mix, often where water pools | At the base of the stems, right at the soil line |
| Pattern | Same all over the tray | Patches that grow from one day to the next | Seedlings fall over in patches that widen |
| Look | Fine, white, tidy, like a bottle brush | Cobweb or cotton, white, gray, green or black, bridging between seeds | Stems thin, pinched and water-soaked, brown or black |
| Mist test | Flattens or seems to disappear, comes back as it dries | Stays put and holds beads of water | Plants stay down |
| Smell | Clean, like damp mix or the plant itself | Musty or sour | Sour or rotten |
Still not sure? Wait a day. Root hairs fade as the roots grow down into the mix. Mold keeps spreading across the surface and up onto the seedlings.
What causes mold and damping-off
Damping-off is caused by several soil fungi and water molds, including Pythium, Rhizoctonia and Fusarium. It rots seeds before they come up, or kills young seedlings soon after. It is hard to stop once you see it, so extension services focus on prevention. The same conditions that favor it also favor surface mold:
- Too much water. A soggy, saturated mix is the biggest single cause.
- Seed sown too thick. Crowded seed traps moisture and blocks airflow at the base.
- Still, humid air. Closed covers and no air movement keep the surface wet.
- Cold, wet conditions. They slow the seedlings down, so they stay in the vulnerable stage longer.
- Dirty trays or the wrong mix. The organisms live in soil and leftover mix. Garden soil, reused mix and trays with old dirt stuck to them bring them in.
How to prevent it next time
- Use fresh, sterile mix for every tray. Seed-starting mix, coconut coir or a fiber mat. Penn State Extension notes you can reuse mix, but new mix each cycle cuts disease. Never use garden soil.
- Sow evenly and not too thick. Follow the seeding rate on the packet. Clumps are where mold starts.
- Water from the bottom. Pour water into the solid tray underneath and let the mix wick it up. Keep it evenly moist, like a wrung-out sponge, not soggy. Pour off any water the mix hasn’t soaked up.
- Move the air. A small fan on low, aimed across the trays, not straight at them, keeps the surface drier and the stems sturdier.
- Get the cover off on time. Once most seeds have sprouted and the stems are standing up, uncover the tray and put it under the light.
- Mind the temperature. Johnny’s Selected Seeds suggests about 75°F (24°C) for germination, then around 60°F (16°C) after. Most home growers do fine in a room between 60 and 75°F.
Other common problems and fixes
| What you see | Likely cause | What to do |
|---|---|---|
| Seedlings on the edges flop, but the stem bases are firm and white | Thirst. The edges dry out first. | Add water to the bottom tray. They usually stand back up within hours. Damping-off doesn’t recover. |
| Tall, thin, pale stems that fall over | Not enough light, or the light is too far away. Too much heat makes it worse. | Move the light closer or use a stronger one, run it 14 to 18 hours on a timer, and keep the room cooler after germination. |
| Yellow leaves right after uncovering | Normal. They grew in the dark. | They should green up within a day or two under light. If they stay yellow, they need more light. |
| Patchy germination, dry seeds on the edges | Uneven mix, seed drying out early, or seed not pressed onto the mix | Level the mix, keep it evenly moist for the first days, cover and weight the seed, and check that the seed isn’t old. |
| Slow, stalled growth | Room too cold | Move the tray somewhere warmer, away from drafty windows. A thermostat-controlled heat mat helps for germination. |
| Tiny black flies around the tray | Fungus gnats. Their larvae live in wet mix. | Let the surface dry more between waterings, water from the bottom, and use yellow sticky traps. Don’t let water stand in the trays. |
| Slimy, brown roots or a rotten smell | Waterlogged mix and root rot | Throw the tray out. Next time water less and make sure the top tray drains. |
How to throw out a bad tray and clean up
- Throw out the whole tray, greens and mix together, in a sealed bag with the household trash. Don’t compost it, and don’t harvest the “good” side.
- Scrub the tray with hot soapy water until no mix or roots are stuck to it.
- Soak it for 30 minutes in 1 part regular, unscented household bleach to 9 parts water. This is the 10 percent soak that Minnesota, Penn State and UC IPM extension recommend for seedling trays.
- Rinse well and let it air-dry before you sow again.
- Clean the scissors and the shelf too. For anything that touches the greens at harvest, a food-safe sanitizer of 1 tablespoon of unscented bleach per gallon of water is enough.
Work with gloves in a ventilated room. Never mix bleach with ammonia or other cleaners.
If the power goes out mid-tray
An outage is hard on a tray for two reasons: the room cools down, and the fan and light stop. Cold, still, damp air is exactly what mold likes. Keep the tray uncovered, don’t water until the surface starts to dry, and move it to the warmest safe room you’re using. Don’t set it next to a space heater or a candle. A small fan and LED light use little power, but in a long outage your battery belongs to the fridge, phones and heat first. See how to heat a room safely without power and what to look for in a portable power station. If the tray starts to smell musty, let it go and sow again when the power is back. Seed is cheap.
Quick answers
Can I just cut above the mold and eat the rest? No. Throw out the whole tray. You can’t see how far the problem has spread through the mix and roots.
Will hydrogen peroxide fix a moldy tray? Some growers spray it, but we don’t recommend using it to save a tray you plan to eat. Prevention works better: less water, more air, clean trays.
Why do my radish and broccoli always look fuzzy on day three? Those crops grow lots of root hairs. If the fuzz is on the roots only, even across the tray, and flattens when misted, keep going.
Should I wash microgreens right after I cut them? No. Store them dry in the fridge and rinse them just before eating. Washing first shortens their fridge life.
Can I reuse the mix for a second tray? It’s better not to. Fresh mix each time is the simplest way to avoid disease. Healthy used mix can go in the compost, but mix from a moldy or rotten tray goes in the trash.
Next week in this series: growing kitchen herbs indoors in winter, with pets and pests in mind. For more ideas on stocking your kitchen this winter, see the 2-week emergency pantry list.
This article is general gardening and food safety information, not medical advice.
Sources: University of Minnesota Extension – How to prevent seedling damping off, Penn State Extension – Safeguard Your Seedlings from Damping-Off, Penn State Extension – Sterilize Containers and Tools, UC IPM – Damping-Off Diseases in the Garden, Mississippi State Extension – Damping-off in Vegetables, Penn State Extension – Growing Microgreens, Johnny’s Selected Seeds – Microgreens Key Growing Information, Oregon State Extension – Fungus gnats, University of Illinois Extension – Cleaning and Sanitizing.